I just love to decorate. My house, my friend's house, my friend's coworker with 2nd hand information and advice relayed back and forth, my brother and sister-in-law's garden (gardening is just decorating your yard) etc. There is something about pattern, line, texture and scale that just thrills me. But I'm sooo thrifty so decorating is like a challenging game. Even when I had my high-powered corporate job and tons of money, I was thrifty with my decorating dollar. It's just more fun for me that way. Anybody can decorate a room with a $15,000 budget. Lets see ya do it for $1500 or even $150! So here are my top frugal decorating tips to help you on your way.
Have a design plan. I can't stress this enough. Draw a diagram of your room. Play with furniture layout prior to purchasing. Measure what size pieces will fit in your room. Pick an inspiration piece for color, texture, style, etc. Determine what your style preference is and stick to it. You've got to use your resources wisely so plan it out ahead of time! And for goodness sakes, don't pick paint color and then try to find fabrics and furnishings to match. Pick your patterns, fabrics and large upholstery pieces first then pull colors from them.
Use Paint. A gallon of paint can totally change the look and feel of a room - for only $35! It's your cheapest design tool. Splash your walls with color, or add just a touch with a feature wall. Don't underestimate the power of paint! You can also paint mismatched accessories, lamps, picture frames, etc. to unify them. Almost everything can be painted.
Shop unexpected sources: Craigs List, Walmart, Target, Overstock.com, eBay, Etsy. Who wouldn't want to be able to shop the high end stores with the amazing catalogs that make us all drool? You CAN get the look for less! I routinely see modern items I love at Design Within Reach for hundred or thousands of dollars. But with major shopping skills I also see similar cheaper designs at Crate & Barrel or CB2 and then even cheaper versions at Ikea or Target. DWR white laminate Saarinen table is $1613 and Ikea's Docksta table has the same look and is only $149. Would I prefer the designer? Not if it is the only thing I can afford and it sits alone in the room. And if you must have the designer version troll Craig's List and eBay looking for people who either don't know what they have and are selling it dirt cheap (my favorite kind of people) or those who know and just want to change out their items. You should get it for at least 50% off list price.
Use unexpected materials. Can't afford the curtains you are lusting after? Make your own with a drop cloth and freezer paper stencils. The blogosphere is full of inventive ideas on using the latest craze in new and inexpensive ways. Think of burlap, twine, painters canvas, books, coffee filters, etc. All items that have been in focus lately and had tons of projects available for you to replicate. When you see something you like in a designer or high end store or catalog Google it! Instead of paying $40 for Ballard Designs burlap curtains, find out how to make your own out of $1.29 a yard burlap.
Accessorize and use scale to your advantage. One large accessory is better than 5 scattered small ones. What's your room's "wow" factor? You only need one. When money is tight, skip all the little things and focus on one "wow".
You can be thrifty and have beautiful things. I hope you are inspired!
Wednesday, June 23, 2010
Tuesday, June 22, 2010
Chicago Craft Social
My tip for my next social: arrive early and go to the table you most want to visit first (duh). I started with the origami flowers and it took up much more time than expected (and I didn't even complete the project although I took supplies home to complete the top 1/2 and it's really cute). And then I couldn't get a seat at the polymer clay table, which I've never done. I really wanted to try the Polyform Clay Mokume Madness project that they were doing. Click on the picture to enlarge it and see the very pretty details.
I even wanted to do the clay craft more so once I won a door prize (!!) of Polyform Clay products. I was so excited! Since I wasn't able to do the craft at the Social, I talked with the leader and got a copy of the instructions so I can try to make the jewelry at home. Their website also has tons of project ideas, like a mint tin covered with the same Mokume technique. Great for business cards and the like. It looks really cool.
Most projects I tried were super simple and required basic supplies. Of course I'll be sharing some with you over the next few weeks!
I'd show you some pictures, but I FORGOT MY CAMERA. Some blogger I am. I've resigned myself to carrying a large, heave purse with my camera (my phone camera stinks), swatches, umbrella, sunglasses, wallet, cell phone, card case, etc. in it at all times. I can't tell you the number of times in the last 2 weeks I've reached for my camera or cards and didn't have them with me. Agh! In fact I have a prototype purse, aka a purse that is now falling apart that I got at a thrift store, that is the "perfect" purse for me. All I need to do is figure out how to construct a new one! I'll be lugging all my junk while being fashionable and organized.
But back to the Craft Social. If you are in the Chicagoland area (the event was held in my hometown of Evanston) come on out next time. You can sign up on their website for emails and details on the next one. You'll have a great time and learn new stuff! Promise.
Monday, June 21, 2010
In the Kitchen - Summer Slaw
This is my favorite go-to dish for picnics. It isn't mayonnaise based so it holds up well in the summer heat. The recipe makes a large bowl full for those big gatherings. You can cut the recipe in half if you want.
Slaw
2 packages Broccoli Slaw Mix
2 cups sunflower kernel seeds
2 cups cashews broken up
2 cups craisens
2 bunches chopped green onions
4 packages chicken Ramen noodles crushed
Dressing
1 cup oil
1 cup vinegar
1/2 cup sugar
4 Ramen chicken flavor packets
Mix the first 5 ingredients in a large bowl. Crush the Ramen noodles and add, reserving the flavor packet for the dressing.
Combine the dressing ingredients in a separate bowl and let set for 1/2 hour, mixing occasionally.
Pour dressing over slaw and toss well.
Enjoy!
Wednesday, June 16, 2010
Things I hate about Craig's List
If you've read my blog, you know I have an undying love for Craig's List. More than half of my retro / Mid Century furniture has come from Craig's List: my couch, dining room table, chairs and hutch, dining room rug, my bedroom suite, my son's futon, desk and chair, retro dining room light fixture, dresser I painted aqua in the living room, glass and wood bar cart in the living room. I won't even list the accessories.
But some posters really bug me. My grammar and spelling isn't always correct, and I can mangle some pronunciations. I use hanging clauses a lot, too many exclamation marks and sometimes what I'm thinking doesn't come out right in my typing. I realize nobody is perfect (least of all me). But these are classic mistakes I see over and over and it drives me batty.
Rod Iron - It's wrought iron as in forged
Dinning Room Table - dining
Chester drawers - chest of drawers (this one really bugs the heck out of me)
buster seat - booster seat
mirrow - mirror
Calling items by the wrong genre - everything is art deco or mid century modern when it's really not
Bran - brand
Armour - Armoire
Post a darn picture so I can see what you are selling!
Post a price not just best offer or call me for more details. I'm lazy. Make it easy for me to buy your crap.
OK, I've got that off my chest. I was window shopping on Craig's List yesterday and had to stop because it just made me angry. Shopping Craig's List should always be a fun activity.
Tuesday, June 15, 2010
Summer List
For years I had planned to take my Son to Japan for several weeks this summer after his High School Graduation. Well life has thrown me topsy-turvy and that plan is no longer viable. We recently talked about a camping trip out West to see the sights: Grand Canyon, Yosemite National Park, etc. For a number of reasons, that plan is also not doable. So filled with Mommy-Guilt that I can't do better, we are having a Stay-cation this summer. Knowing how easy it is to let the days slide by without actually doing anything, I wanted to make a Summer List of fun things to do. I got this idea from Kimba at A Soft Place to Land. Without further ado, my family's Summer List.
What's on your list to do this summer?
Saturday, June 12, 2010
Redecorating my blog
It's just adorable. I'd love to have it. I love that it has a white middle where the text goes. I don't know if you noticed but mine is a graduated yellow. I don't like how graphics with a white background look on it. If that is something I can change I haven't figured out how to do it. Anyway, Love, Love, Love the Brooke background.
And then I think about the blogs that I love like How About Orange, Centsational Girl, Living With Lindsay, Poppies at Play, and Homemade Mamas. They have such graphic and clean lined appearance and are cute but not cutesy. They have lots of white space and aren't crowded. They appeal to my modern, minimal sensibilities. In reality, if I change my blog I should head more in that direction and away from the cute appeal of the Brooke background.
What do you think? Is it time to redecorate my blog? Or should I just go find something to paint and leave the blog alone?
Well I wrote the above and then decided to change my blog before I even posted it! I went with a more modern, graphic, streamlined look instead of cute and also made subtle changes to my layout. Tell me what you think!
Friday, June 11, 2010
Fab Friday Favorites
It's been a couple weeks since my last Fab Friday Favorites. Did you miss it? Most of these projects are from posts a few weeks old, but they are still great projects!
I've seen decorated rubber gloves in stores like Marshalls and TJ Maxx and have thought they were adorable, but they cost almost $20 for a pair. Too expensive! Super QT On the Hill shows you how to make them. These might almost make washing dishes fun (almost).
I think we've all probably seen pictures of stacked suitcases used as tables. One Cheap B*tch uses that idea but painted the suitcases a uniform color. I think the results look stunning. I have the perfect place in my living room (once the dog bed goes in my son's room when he's off to college in the fall) for this. And I will use the suitcases to store out of season clothes! Good looking and practical. Nice job!
Jen at Tatertots and Jello made this adorable ruffled pillow. I like it because its very big and very ruffley and makes such a statement. And look at that gorgeous bed! She has a great tutorial showing how to make the pillow. Oh and by the way - she used an old bedskirt to make it!
Sabby In Suburbia shows how to transfer images printed on an ink jet printer to a painted canvas using modge podge. Love it!
Kristi at The Speckled Dog (love the blogs looks and content!) updated this paper towel holder with paint and a funky knob and completely transformed it. I think it looks great and adds a design punch to a utilitarian object. See you can decorate anything - even a paper towel holder!
Starburst mirrors are pretty iconic in Mid Century Designs. Craving Some Creativity shows you how to make one for about $5. I'm seriously looking to see where I can put one in my condo because I want to make this!
Lyssa at The Crafty Clique made this fun coffee table. I really love the numbers.
This adorable bracelet is made using Shrinky Dinks for Ink Jet Printers! I remember making shrinky dinks as a kid. I didn't know they still existed. Stories by Mel shows you how to make it and add scrapbook paper to the backs of the pictures to finish them. What a fun technique.
I hope you enjoyed this weeks Fab Friday Favorites!
I've seen decorated rubber gloves in stores like Marshalls and TJ Maxx and have thought they were adorable, but they cost almost $20 for a pair. Too expensive! Super QT On the Hill shows you how to make them. These might almost make washing dishes fun (almost).
I think we've all probably seen pictures of stacked suitcases used as tables. One Cheap B*tch uses that idea but painted the suitcases a uniform color. I think the results look stunning. I have the perfect place in my living room (once the dog bed goes in my son's room when he's off to college in the fall) for this. And I will use the suitcases to store out of season clothes! Good looking and practical. Nice job!
Jen at Tatertots and Jello made this adorable ruffled pillow. I like it because its very big and very ruffley and makes such a statement. And look at that gorgeous bed! She has a great tutorial showing how to make the pillow. Oh and by the way - she used an old bedskirt to make it!
Kristi at The Speckled Dog (love the blogs looks and content!) updated this paper towel holder with paint and a funky knob and completely transformed it. I think it looks great and adds a design punch to a utilitarian object. See you can decorate anything - even a paper towel holder!
Starburst mirrors are pretty iconic in Mid Century Designs. Craving Some Creativity shows you how to make one for about $5. I'm seriously looking to see where I can put one in my condo because I want to make this!
Lyssa at The Crafty Clique made this fun coffee table. I really love the numbers.
This adorable bracelet is made using Shrinky Dinks for Ink Jet Printers! I remember making shrinky dinks as a kid. I didn't know they still existed. Stories by Mel shows you how to make it and add scrapbook paper to the backs of the pictures to finish them. What a fun technique.
I hope you enjoyed this weeks Fab Friday Favorites!
Thursday, June 10, 2010
How to Leave a Clickable Link in a Blog's Comment Section
Do you comment on blog posts and leave your blog's address under your name? Want to learn how to make it a clickable link that takes people directly to your blog? It's super simple and just requires a little HTML code.
Type your comments and add your name. On the next line you want to type <a href="URL of target site">anchor text</a>
The word "anchor text" is a description (the title of a blog, post, anything you like) and is what will be displayed on a browser. For example, the HTML for the hyperlink to my blog should be typed as:
<a href="http://www.blackkatsdesign.blogspot.com">Black Kats Design</a>
And will display Black Kats Design
If you want to display your URL and have it clickable just type
<a href="http://www.blackkatsdesign.blogspot.com">http://www.BlackKatsDesign.blogspot.com</a>
And it will display http://www.BlackKatsDesign.blogspot.com
Told you it was easy peasy! Leave me a comment and try it out.
Edited to add: Linking up to these great parties! Come join in the fun.
Wednesday, June 9, 2010
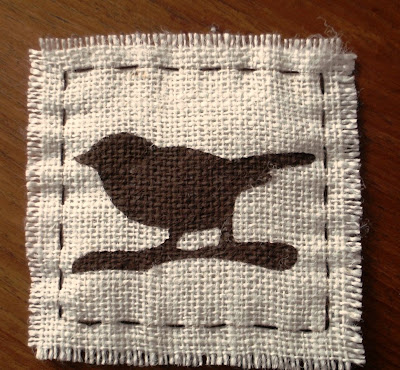
It's Craft Time - Burlap and Freezer Paper Stencil Coasters
This is another project I made weeks ago when my friend Alison was visiting. She did the sewing and I did the stenciling.
First make sure when you purchase burlap that it is cut on the straight of grain. With mine, the lady at Joanns just cut it and I wasn't paying attention. When I brought it home and trued it up I lost almost a 1/3 yard of fabric.
Cut a burlap square for each coaster you want to make. Mine are 5" square. Cut one square of craft felt 1/4" smaller than the burlap square. Use pinking sheers and cut the edges so they have a nicer appearance. Center a piece of felt on a burlap square. Stitch 1/8" in from the edge of the felt all the way around the coaster. Hand sew a running stitch using colored floss on your sewn line. I lightly frayed the edges of my coaster by pulling out a burlap thread or two on each side.
For the stencil, find an image you like. My experiment piece was a retro starburst flower type of design. It looked great but took me longer to cut out with an exacto knife than I was willing to spend. Once I had the freezer paper stencil process down I used an image of a bird that was much quicker to cut out with a pair of scissors. Use your computer software to size your picture to what you need. I used Photoshop, but you can use whatever drawing / painting program you have and are comfortable with. Print the picture and hold it up to the coaster to double check your size.
Transfer the picture to the dull side of your freezer paper. I found it easiest to tape my picture to my window put up a piece of freezer paper with the shiny side toward the window and trace on the dull side. Trace as many images as you have coasters. Each stencil can only be used once. Make sure you leave plenty of room around each image as you will be cutting out the image and need the "frame" around it left intact.
Iron the cut out stencil (shiny side down) onto the coaster. It only takes a second or two to adhere with a hot iron. You can also eye ball and iron on any pieces which were not attached to your stencil. I had the piece between the birds legs and the branch to iron down. Paint within the stencil with your choice of regular craft paint. Paint with a pouncing motion instead of a sweeping motion. Let the paint dry for 5 minutes or so and peel off the freezer paper stencil. Let the paint dry completely before using the coaster.
With the bird coasters, I stenciled first and Alison sewed when they were done. With my second set of coasters, Alison had already sewn the coaster and then I stenciled. Both sequences worked fine.
Linking up to these wonderful parties!
Tuesday, June 8, 2010
New Pillows!
When my friend Alison visited this last time, she made me new pillows for my couch. I can sew, but Alison is an expert seamstress and actually enjoys the process of sewing (me - not so much). I don't have a before picture, as we were so excited we started without thinking. Here is the before fabric (if you remember my living room tour here, the pillows matched the trim on my rolling ottomans.
Here are the finished results. We kept the same shape. Don't they look great? I just love how the colors are the same, but they are different animal patterns. Both have turquoise ends which coordinates with my wall color. I took my black slipcover off the loveseat for a summer look and it really needed a spark of somethin', somethin'. These pillows do the trick. Thanks Alison! (pay no attention to the messy coffee table in the last picture. In it I'm actually working on a craft project - burlap coasters with freezer paper stencils! More to come on them soon).
I'm joining up to these fantastic link parties! Come check them out.
Monday, June 7, 2010
Congratulations Graduate!
My darling Son graduated from High School yesterday. I'm such a proud Momma! It's so hard to believe that he's 18 and a High School Graduate. Seems like just yesterday he was 6 and finishing Kindergarten. How time flies. This fall he's off to college at the Savannah College of Art and Design in Georgia to study photography and graphic design. He will be so far away from me (the Chicago area) and I will be living alone for the first time in my life. Big changes in store for both of us!
Tuesday, June 1, 2010
Barcode Art
I've become mildly obsessed with Barcode Art. I don't know what sparked the obsession, I just know I want a print in my condo. My problem? Cost. I'm super cheap. Do you think I could make it? I'm thinking it's just a lot of painters tape for the stripes and a number stencil on a canvas. I think under $20 bucks total cost with a 40% off coupon for the canvas. What do you think?
All Modern.com wall sticker art for $90.
I just love the barcode graffiti at Senses Lost.
Barcode protest art shown at Ad Land.
Barcodes Inc has an online generator where you can change the size and the output in order to create your design.
You can barcode yourself at Barcodeart.com. The barcode above contains data about my age, country, height and weight. At the site you can purchase your barcode on fun things like tattoos and dog tags. You can also get a custom painting for $350.
I'm adding the project to my lengthy craft to-do list. If you make one, show me! I'd love to hear how it went.
Subscribe to:
Posts (Atom)